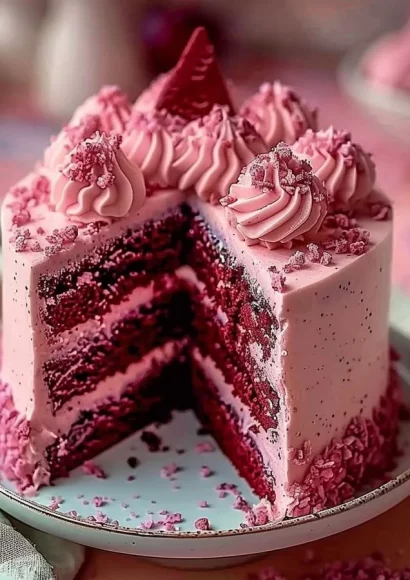
Pink Velvet Dream Cake Recipe
The Pink Velvet Dream Cake is a whimsical dessert that envelops you in a sweet, rosy embrace with every delectable bite. Imagine taking a slice and being greeted by the fluffy, velvety texture that melts in your mouth, while the aromatic scents of vanilla and cream cheese waft through the air. This step-by-step recipe not only satiates your sweet cravings but also warms the heart, making every gathering a little more special. Each layer is infused with a burst of flavor and a vibrant hue that invites both nostalgia and joy, creating unforgettable moments to share with loved ones.
History / Fun Fact
The origins of red velvet cake can be traced back to the 1800s, with the vibrant pigment often attributed to cocoa powder’s reaction with acidic ingredients like buttermilk and vinegar. Over the years, as the cake evolved, bakers experimented by introducing food coloring, transforming it into the iconic red hue. The Pink Velvet variant emerged as a charming twist, perfect for celebrations like birthdays, weddings, or Valentine’s Day. Known for its romantic essence and enchanting allure, the Pink Velvet Dream Cake has become a modern favorite, often gracing dessert tables and capturing hearts with its delicate beauty.
Ingredients
To master the Pink Velvet Dream Cake, gather the following ingredients, each playing a vital role in crafting this flavorful masterpiece:
- 2 1/2 cups all-purpose flour: This forms the soft, tender base, holding the cake together while maintaining its lightness.
- 1 1/2 cups granulated sugar: A sweet embrace that caramelizes slightly during baking, adding depth and richness.
- 1 tsp baking soda: The leavening agent that lifts the cake, creating a delightful texture.
- 1 tsp salt: Enhances the sweetness while balancing flavors.
- 1 tsp cocoa powder: Gives a subtle hint of chocolate, adding complexity to the cake’s flavor profile.
- 1 1/2 cups vegetable oil: Provides moisture, resulting in an irresistibly moist cake.
- 1 cup buttermilk, room temperature: Adds tang and helps create that tender crumb.
- 2 large eggs, room temperature: Essential for binding, they create unity within the batter.
- 2 tbsp red food coloring: Infuses the cake with the signature pink hue, brightening up its visual appeal.
- 1 tsp white vinegar: Reacts with the baking soda, promoting rise and lightness.
- 1 tsp vanilla extract: A fragrant note that enhances the overall flavor.
- 8 oz cream cheese, softened: A creamy base for the frosting, bringing richness and tanginess to every bite.
- 1/2 cup unsalted butter, softened: Adds a smooth, luxurious texture to the frosting.
- 4 cups powdered sugar: Sweetness on sweetness, creating the perfect balance for our frosting.
- 1 tsp vanilla extract: Another layer of aromatic delight in the frosting.
With these carefully selected ingredients, you’re just a step away from creating an extraordinary treat.
Cooking Time & Tips For Pink Velvet Dream Cake
When it comes to preparing the Pink Velvet Dream Cake, timing can be your best friend. Quickly preparing and baking this cake will yield a moist and tender finish, as the ingredients meld into flavor harmony. A slow approach, allowing each step to become a delightful ritual, is just as rewarding. Even the process of waiting for the layers to cool can build anticipation as you envision the cake’s presentation.
Practical Tips for Success:
- Ensure all your ingredients are at room temperature before starting—this ensures a smoother batter.
- Be gentle when mixing; overworking the batter can lead to a dense cake.
- Allow the cakes to cool completely before frosting for a flawless finish.
Step-by-Step Directions
- Preheat the oven to 350°F (175°C): Prepare your baking environment while the anticipation builds.
- Grease and flour two 9-inch round cake pans: A light dusting of flour will help your cakes release effortlessly once baked.
- In a large bowl, whisk together the flour, sugar, baking soda, salt, and cocoa powder: This blend should be light and airy; set the stage for the cake’s structure.
- In a separate bowl, whisk together the vegetable oil, buttermilk, eggs, red food coloring, vinegar, and vanilla extract: This mixture should be smooth and vibrant, bursting with potential.
- Gradually add the wet ingredients to the dry ingredients: Combine gently until just incorporated; avoid overmixing as your batter begins to transform.
- Divide the batter evenly between the prepared cake pans: A kitchen scale can be your ally here to ensure even layers.
- Bake for 25-30 minutes or until a toothpick inserted into the center comes out clean: The sweet fragrance wafting through your kitchen signifies you’re on the right path!
- Let the cakes cool in the pans for 10 minutes: Then, transfer them to a wire rack to cool completely, savoring the anticipation of frosting.
- For the frosting, beat the cream cheese and butter together until smooth: This combination should create a light, creamy texture, rich in flavor.
- Gradually add the powdered sugar and vanilla extract: Continue beating until your frosting is light and fluffy, invitingly sweet.
- Once the cakes have cooled completely, layer one on a serving plate: Spread a generous layer of frosting over the top, creating a delicious foundation.
- Place the second cake layer on top: Frost the top and sides, creating a dreamy pink exterior.
- Decorate with sprinkles or edible flowers if desired: This final touch adds a flourish of beauty, transforming the cake into a centerpiece.
Immerse yourself in the joy of creating this cake, and let every step spark delight as the luscious aroma envelops your kitchen.
Serving Suggestions & Occasions
The beauty of the Pink Velvet Dream Cake lies in its versatility. Serve it as a stunning centerpiece at birthday parties or wedding celebrations, captivating guests with its vibrant color and delightful flavor. Pair it with a cup of freshly brewed tea or coffee for a cozy afternoon get-together. Alternatively, consider enjoying it on special occasions like anniversaries or holidays, where it can symbolize love and joy. Its exquisite appeal is sure to delight both young and old, making every slice feel like a celebration in itself.
Common Mistakes For Pink Velvet Dream Cake
- Not measuring ingredients accurately: This can severely affect the texture and flavor of your cake.
- Overmixing the batter: Leads to a denser cake; gentle folding is key!
- Skipping the cooling time: Frosting on a warm cake can turn into a melted mess.
- Underbaking/overbaking: Keep a close eye on the baking time. Every oven is different!
- Using cold ingredients: Bring your eggs and buttermilk to room temperature for the best texture.
Healthier Alternatives & Variations
If you’re looking to lighten up your Pink Velvet Dream Cake, consider these substitutions:
- Whole wheat flour instead of all-purpose flour for added fiber.
- Greek yogurt can replace some or all of the buttermilk.
- Natural sweeteners, like honey or maple syrup, can be used in place of white sugar for a healthier twist.
- Experiment with adding pureed fruit for a unique flavor—such as strawberry puree for even more pink delight!
FAQs
-
Can I make this cake ahead of time?
- Absolutely! You can bake the cakes a day in advance and store them wrapped in plastic wrap.
-
What if I don’t have buttermilk?
- You can make a quick substitute by adding 1 tablespoon of lemon juice or vinegar to a cup of milk and letting it sit for 5-10 minutes.
-
Is there a gluten-free option?
- Yes, you can replace all-purpose flour with a gluten-free baking blend.
-
Can I freeze the Pink Velvet Dream Cake?
- Yes, you can freeze the layers separately; just ensure they’re well wrapped to prevent freezer burn.
-
How can I achieve a deeper pink color?
- Add more food coloring gradually until you reach your desired shade, but be cautious not to overdo it.
-
What is the best way to store leftovers?
- Keep the cake in an airtight container at room temperature for up to three days, or refrigerate for longer freshness.
Conclusion
Don’t let the charming allure of the Pink Velvet Dream Cake pass you by! With its enchanting flavor, delightful textures, and beautiful presentation, it’s an instant crowd-pleaser. Whether you’re celebrating a special occasion or simply treating yourself, this cake will undoubtedly elevate your dessert experience. So gather your ingredients and embark on this baking adventure; let every slice bring joy and sweetness into your kitchen!

Pink Velvet Dream Cake
Ingredients
Method
- Preheat the oven to 350°F (175°C).
- Grease and flour two 9-inch round cake pans.
- In a large bowl, whisk together flour, sugar, baking soda, salt, and cocoa powder.
- In a separate bowl, whisk together vegetable oil, buttermilk, eggs, red food coloring, vinegar, and vanilla extract.
- Gradually add wet ingredients to dry ingredients; combine gently until just incorporated.
- Divide the batter evenly between prepared cake pans.
- Bake for 25-30 minutes or until a toothpick inserted comes out clean.
- Let the cakes cool in the pans for 10 minutes, then transfer to a wire rack to cool completely.
- Beat cream cheese and butter together until smooth.
- Gradually add powdered sugar and vanilla extract, beating until light and fluffy.
- Layer one cake on a serving plate and spread a generous layer of frosting over the top.
- Place the second cake layer on top and frost the top and sides.
- Decorate with sprinkles or edible flowers if desired.