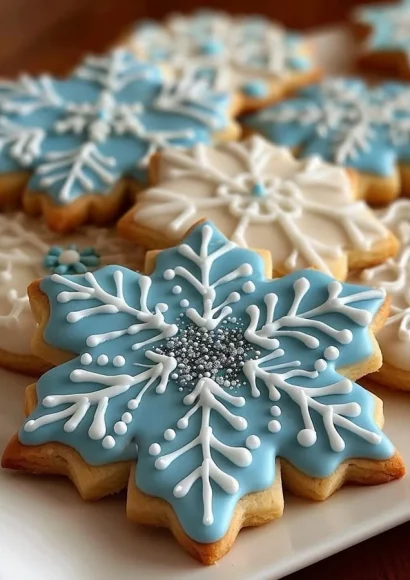
Snowflake Sugar Cookies
Snowflake Sugar Cookies are a delightful treat that captures the spirit of winter with their delicate shapes and sweet flavors. With their buttery richness and sugary sweetness, these cookies evoke a sense of warmth and joy, making them perfect for festive gatherings or cozy nights in. This recipe provides a step-by-step guide to help you craft these enchanting snowflakes, ensuring that every bite brings a smile. Plus, their beautiful and intricate designs make them a visual feast that’s truly worth the effort to create.
Why You’ll Love This Recipe
There are countless reasons to fall in love with Snowflake Sugar Cookies. For starters, they require easy prep and use minimal ingredients, making them accessible for both novice and seasoned bakers alike. The step-by-step approach employed in this recipe simplifies the process, ensuring that you can quickly whip up these festive delights without stress.
Furthermore, this recipe is family-friendly, inviting little hands to join in the decorating fun. It’s a wonderful opportunity to create lasting memories, making baking a shared joy. The traditional flavors and creative decorating options provide a canvas for your culinary imagination, allowing you to personalize each batch.
Ingredients for Snowflake Sugar Cookies
To create these delicious Snowflake Sugar Cookies, you’ll need the following ingredients:
- 2 3/4 cups all-purpose flour – Light and fluffy, providing the perfect base.
- 1 teaspoon baking powder – Ensures the cookies rise beautifully.
- 1/2 teaspoon salt – Balances the sweetness and enhances the flavors.
- 1 cup unsalted butter, softened – Adds a rich and creamy texture.
- 1 1/2 cups sugar – Sweetens the dough, creating a delectable treat.
- 1 large egg – Binds the ingredients together for perfect consistency.
- 1 teaspoon vanilla extract – Infuses a warm sweetness to the cookies.
- 1/2 teaspoon almond extract (optional) – Offers a hint of nutty flavor.
- 1 egg white (or 2 tablespoons meringue powder) – Essential for the royal icing.
- 1 1/2 cups powdered sugar – For making the icing luscious and sweet.
- 1/2 teaspoon lemon juice – Adds a refreshing tang to the icing.
- Food coloring (optional for decoration) – Transform your cookies into colorful masterpieces.
Step-by-Step Directions
-
Preheat the Oven: Begin by preheating your oven to 350°F (175°C). Line your baking sheets with parchment paper to prevent sticking.
-
Whisk Dry Ingredients: In a medium bowl, whisk together the flour, baking powder, and salt until well combined. This will ensure your cookies have a balanced rise and texture.
-
Cream Butter and Sugar: In a large bowl, beat the softened butter and sugar together until light and fluffy, creating a creamy mixture that adds richness to your cookies.
-
Add Wet Ingredients: Beat in the egg, vanilla extract, and almond extract (if using) until all ingredients are well incorporated.
-
Combine Wet and Dry Ingredients: Gradually add the dry ingredients to the wet mixture, stirring until the dough comes together. This is the time to mix and discover the beautiful dough that will be shaped into snowflakes.
-
Roll Out the Dough: On a floured surface, roll out the dough to about 1/4 inch thick. Use a snowflake-shaped cookie cutter to cut out the cookies, adding a magical touch.
-
Bake: Place the cookies on the prepared baking sheets and bake for 8-10 minutes, or until the edges are lightly golden. Your kitchen will soon fill with delightful aromas!
-
Cool: Once baked, allow the cookies to cool completely on a wire rack, ensuring they hold their shape perfectly.
-
Prepare Royal Icing: For the royal icing, whisk the egg white or meringue powder with lemon juice until soft peaks form. Gradually add powdered sugar, continuing to whip until you achieve stiff peaks.
-
Decorate: Divide the icing into bowls and add food coloring if desired. Use this icing to decorate the cookies with beautiful snowflake patterns. Allow the icing to dry completely before serving or packaging.
Tips & Tricks
To elevate your Snowflake Sugar Cookies, consider these chef’s secrets:
- Chill the Dough: If your dough feels too soft to roll out, refrigerate it for 30 minutes to make it easier to handle.
- Use Quality Butter: Opt for high-quality unsalted butter for the best flavor.
- Experiment with Flavors: While almond extract is optional, try adding a hint of other extracts like lemon or orange for a unique twist.
- Decorating Tools: Invest in a variety of piping tips for your icing to create intricate designs and personalize each cookie.
- Batch Baking: Make a double batch and freeze half of the dough. You’ll have fresh cookies ready for impromptu gatherings!
Serving Suggestions & Pairings
When it comes to serving Snowflake Sugar Cookies, creativity knows no bounds. Consider arranging them on a festive platter adorned with silver and blue decorations, reminiscent of a winter wonderland. Pair these cookies with a cozy beverage, such as a warm cup of spiced chai, rich hot chocolate, or a soothing herbal tea.
These cookies also make for wonderful gifting. Package them in clear cellophane bags tied with a ribbon, or place them in decorative tins for a lovely surprise. Share the joy of baking with family and friends by inviting them to decorate their own cookies together!
Nutritional Information
While exact caloric content can vary, a single Snowflake Sugar Cookie typically contains approximately 150-200 calories. Each cookie offers a blend of carbohydrates from sugar and flour, healthy fats from butter, and a small amount of protein from the egg. As with all treats, moderation is key, especially during the festive season when sweets can be abundant.
Storing Tips & Variations for Snowflake Sugar Cookies
To preserve the deliciousness of your Snowflake Sugar Cookies, follow these simple storing tips:
- Room Temperature Storage: Keep the cookies in an airtight container at room temperature for up to a week.
- Freezing Dough: If you want to prepare ahead, freeze the dough. Wrap it tightly in plastic wrap, and it can last up to three months.
- Icing Storage: Once decorated, cookies are best eaten within a few days due to the icing; however, uniced cookies can be stored for longer.
- Healthier Swaps: Consider using whole wheat flour or coconut sugar for a healthier alternative. Remember that adjustments might alter the texture slightly, but creativity in the kitchen is always encouraged!
Conclusion for Snowflake Sugar Cookies
Don’t wait any longer—indulge in the festive spirit with your very own Snowflake Sugar Cookies! Their delightful taste and attractive appearance are sure to impress friends and family alike. With the approachable step-by-step recipe, you can create these adorable treats that bring sweetness to every occasion. Jump into the kitchen, have fun, and let your creativity shine!
FAQs
1. Can I use margarine instead of butter for the cookies?
Yes, you can use margarine, but be aware that it might affect the flavor and texture of the cookies.
2. How can I fix dough that is too sticky?
If your dough feels overly sticky, add a bit more flour, one tablespoon at a time, until it reaches a manageable consistency.
3. Can I make the cookies without the royal icing?
Yes, the cookies can be enjoyed plain or dusted with powdered sugar for a simpler decoration.
4. Is there a dairy-free option for this recipe?
Yes! Substitute the butter with a dairy-free margarine or coconut oil and ensure to use non-dairy egg replacements if needed.
5. How do I decorate the cookies with royal icing?
Simply fill a piping bag with icing and create beautiful designs by piping directly onto the cooled cookies. Let your imagination guide you!

Snowflake Sugar Cookies
Ingredients
Method
- Preheat your oven to 350°F (175°C) and line your baking sheets with parchment paper.
- In a medium bowl, whisk together the flour, baking powder, and salt until well combined.
- In a large bowl, beat the softened butter and sugar together until light and fluffy.
- Beat in the egg, vanilla extract, and almond extract (if using) until fully incorporated.
- Gradually add the dry ingredients to the wet mixture, stirring until the dough just comes together.
- On a floured surface, roll out the dough to about 1/4 inch thick and cut out cookies using a snowflake-shaped cookie cutter.
- Place the cookies on the prepared sheets and bake for 8-10 minutes or until the edges are lightly golden.
- Allow the cookies to cool completely on a wire rack.
- Whisk the egg white or meringue powder with lemon juice until soft peaks form. Gradually add powdered sugar to achieve stiff peaks.
- Divide the icing into bowls and add food coloring if desired. Use for decorating the cooled cookies.
- Allow the icing to dry completely before serving or packaging.