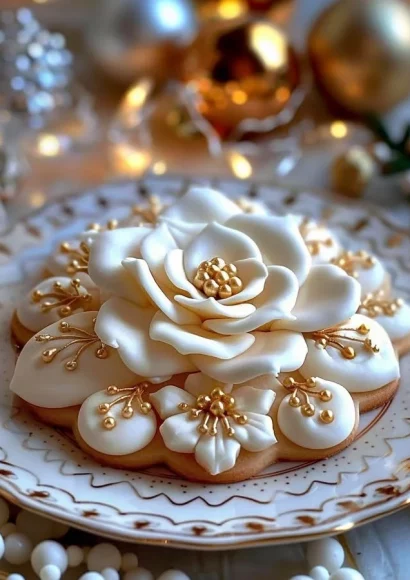
Chamomile Charm Holly Cookies Blooming with Holiday Magic
Embrace the enchanting holiday spirit with the Chamomile Charm Holly Cookies, a delightful recipe that marries soothing aromas and festive flavors into a beloved treat. These cookies, with their rich, buttery base and whimsical holly shapes, invite everyone into a cozy kitchen filled with the sweet scent of baked goods. This step-by-step recipe will guide you through creating these beautiful cookies, perfect for holiday gatherings or as heartfelt gifts for loved ones. As the warm buttery fragrance wafts through your home, each bite will transport you to festive memories, making each moment spent baking feel like a cherished tradition.
History / Fun Fact
The humble cookie has long been a part of culinary traditions across cultures, but the Chamomile Charm Holly Cookies are inspired by a unique blend of tea traditions and holiday cheer. Chamomile, derived from flowers known for their calming properties, has been enjoyed as a soothing drink for centuries. The incorporation of these calming essences into cookies is a delicious nod to this history, transforming the mellow flavor of chamomile into a delightful treat that resonates with the warmth of the season. The holly shape of these cookies not only adds visual appeal but also symbolizes the spirit of Christmas and renewal, making every cookie a tiny celebration of life’s joys.
Ingredients
- 2 3⁄4 cups (345g) all-purpose flour: Tender and finely milled, providing the perfect structure for our cookies.
- 1 cup (225g) unsalted butter, softened: Creamy and rich, it melts beautifully to create a luxurious texture.
- 3⁄4 cup (150g) granulated sugar: Sweet and sparkling, it sweetens every bite.
- 1 large egg: Binding elements together, lending moisture and richness.
- 1 tsp vanilla extract: Aromatic and warm, adding a nostalgic sweetness.
- 1/2 tsp almond extract (optional): A hint of nuttiness that adds depth to the flavor profile.
- 1/2 tsp baking powder: A light, airy touch to ensure our cookies rise perfectly.
- 1/4 tsp salt: Enhancing flavors and balancing sweetness.
- 4 cups (480g) powdered sugar: Essential for our royal icing, providing a sweet canvas for decoration.
- 3 tbsp meringue powder: Adds stability and that lovely glossy finish to our icing.
- 5-6 tbsp water: To achieve the perfect consistency for our royal icing.
- White gel food coloring: To create a pure white icing for festive decoration.
- Gold edible paint or luster dust: To sprinkle a little holiday magic and shimmer on our cookies.
- Small gold sugar pearls: Charming accents that add elegance to our festive creations.
Cooking Time & Tips For Chamomile Charm Holly Cookies
Navigating through the kitchen can seem daunting, especially when preparing cherished holiday treats. One winning strategy is understanding the difference between quick and slow preparation. Quick prep is about efficiency, speeding through basic techniques without sacrificing quality, while slow preparation allows flavors to develop, building a deeper connection to the seasons and foods. For this cookie recipe, take a moment to enjoy the process—allow the butter to cream until light and fluffy, ensuring an airy texture that will be well worth the extra minute.
For success, ensure all ingredients are at room temperature to help them blend seamlessly. Use a light hand when mixing: overworking can yield tough cookies. Plus, when applying royal icing, consider practicing on parchment paper before hitting the cookies to gain confidence. No one wants to stress during the holidays; remember that the perfect cookie is one made with joy!
Step-by-Step Directions
-
Preheat the oven to 350°F (175°C) and line two baking sheets with parchment paper. This creates a non-stick surface that is essential for even baking and easy clean-up.
-
In a large mixing bowl, cream together the softened butter and granulated sugar until light and fluffy, approximately 3-5 minutes. This process aerates the butter, resulting in a tender and buttery texture.
-
Add the egg, vanilla extract, and almond extract (if using), mixing until fully incorporated. You should see the mixture transform into a light, inviting golden mass, signaling the perfect blend.
-
In a separate bowl, whisk together the all-purpose flour, baking powder, and salt. This step helps incorporate the baking powder evenly throughout the flour, ensuring a consistent rise in your cookies.
-
Gradually add the dry ingredients to the wet ingredients, mixing gently until a smooth dough forms. The dough will come together cohesively, emitting a delightful scent that hints at the sweet treats to expect.
-
Divide the dough into two portions, encapsulating the magic in manageable bites.
-
Roll out each portion between two sheets of parchment paper to about 1⁄4-inch thickness. Enjoy the tactile feel of the dough as it continues to transform beneath your rolling pin.
-
Use a cookie cutter to cut out holly-shaped cookies, then transfer them to the prepared baking sheets. Each cut-out will represent the joy of holidays past and present.
-
Bake for 10-12 minutes, or until the edges of the cookies are lightly golden. The moment you pull them from the oven, let the warm, comforting aroma envelop you.
-
Let them cool completely on the baking sheets. This allows them to firm up, making decorating easier.
-
For the royal icing, whisk together the powdered sugar, meringue powder, and water until smooth and stiff peaks form. This icing is easily customizable and incredibly versatile.
-
Add a few drops of white gel food coloring and mix until you achieve a lovely bright white icing.
-
Once cooled, use a piping bag to decorate each cookie with royal icing, creating delightful holly leaf shapes or intricate festive designs. Remember, perfection isn’t the goal—all designs are beautiful in the spirit of the season!
-
For added holiday charm, gently brush the edges of the cookies with gold edible paint or luster dust and sprinkle small gold sugar pearls as decoration.
-
Allow the icing to dry completely before serving or packaging—this patience culminates in stunning holiday sweets brimming with charm.
Serving Suggestions & Occasions
These Chamomile Charm Holly Cookies are delightful served on a cozy platter at holiday parties or wrapped in festive cellophane as thoughtful gifts. They pair wonderfully with a steaming cup of chamomile tea, enhancing the soothing qualities of the herbs and making each bite feel like a warm hug. Send them to school parties, use them for cookie exchanges, or enjoy them for a quiet family evening, creating cherished seasonal memories. Their visually appealing decoration embodies the spirit of the holidays, making them a perfect centerpiece on your dessert table.
Common Mistakes For Chamomile Charm Holly Cookies
Creating the perfect cookie comes with its pitfalls. One common mistake is not allowing the butter to soften adequately, resulting in a dense cookie. Make sure your butter is at room temperature for optimal blending. Another error is rolling the dough too thin; when baked, these cookies will spread excessively, losing their charming shapes. Lastly, be cautious with oven temperatures—using an oven thermometer can guide to a perfectly baked cookie. Finally, don’t rush the icing process! Allow royal icing to dry thoroughly before stacking or packaging to avoid heartbreaking messes.
Healthier Alternatives & Variations
For those looking to lighten up this recipe, consider using unsweetened applesauce as a partial butter substitute, which can maintain moisture while reducing fat content. You can also substitute whole wheat flour for all-purpose flour for a nuttier flavor and additional fiber. As for variations, feel free to infuse the dough with spices such as cinnamon or nutmeg to elevate the flavor profile. Experiment with different shapes, creating stars or Christmas trees, and switch up the decorations to suit personal tastes. Don’t forget to add some festive sprinkles or colored sugar to bring even more joy to the holiday cookies!
FAQs
-
Can I make these cookies gluten-free?
Yes! Substitute all-purpose flour with a gluten-free blend. -
How long do these cookies last?
Store in an airtight container at room temperature for up to a week. -
Can I freeze the dough?
Absolutely! Wrap the dough tightly in plastic wrap and freeze for up to 3 months. -
What can I use instead of meringue powder?
You can use egg whites for a traditional royal icing, but adjust the water amount as needed. -
Is the almond extract necessary?
No, it’s optional! You can simply omit it for a purer vanilla flavor. -
Can I use different colors for the icing?
Yes! Feel free to use any gel food color to create colorful icing for all occasions.
Conclusion
There’s something undeniably magical about the Chamomile Charm Holly Cookies that beckons you to the kitchen, inviting you to craft delicious memories. The blend of aromatic chamomile with the sweet, buttery cookies creates a delightful sensation that fills your heart with warmth. As the holiday season beckons, why not try out this beautiful recipe? Gather your loved ones, share in the joy of baking, and let the holiday spirit flourish in every bite. You won’t just taste the love—you’ll feel it too. Embrace the magic and make these cookies a tradition in your home!

Chamomile Charm Holly Cookies
Ingredients
Method
- Preheat the oven to 350°F (175°C) and line two baking sheets with parchment paper.
- In a large mixing bowl, cream together the softened butter and granulated sugar until light and fluffy, approximately 3-5 minutes.
- Add the egg, vanilla extract, and almond extract (if using), mixing until fully incorporated.
- In a separate bowl, whisk together the all-purpose flour, baking powder, and salt.
- Gradually add the dry ingredients to the wet ingredients, mixing gently until a smooth dough forms.
- Divide the dough into two portions and roll out each portion between two sheets of parchment paper to about 1/4-inch thickness.
- Use a cookie cutter to cut out holly-shaped cookies and transfer them to the prepared baking sheets.
- Bake for 10-12 minutes, or until the edges of the cookies are lightly golden.
- Let them cool completely on the baking sheets before decorating.
- For the royal icing, whisk together the powdered sugar, meringue powder, and water until smooth and stiff peaks form.
- Add a few drops of white gel food coloring and mix until you achieve a lovely bright white icing.
- Once cooled, use a piping bag to decorate each cookie with royal icing, creating festive designs.
- Brush the edges of the cookies with gold edible paint or luster dust and sprinkle small gold sugar pearls as decoration.
- Allow the icing to dry completely before serving or packaging.