
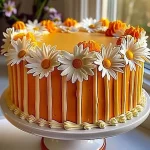
Orange Creamsicle Cake with Daisy Decoration
Orange Creamsicle Cake is a delightful dessert that combines the nostalgic taste of childhood summer days with the elegance of a beautifully decorated cake. This recipe, presented in a step-by-step manner, will guide you through creating a moist and flavorful orange-infused cake topped with fluffy cream frosting, resembling the beloved orange creamsicle ice cream. What makes this cake so appealing is its comfort and charm, making it a perfect centerpiece for family gatherings, birthday parties, or just a sweet treat on a sunny afternoon.
Why You’ll Love This Recipe
There are countless reasons to fall in love with this Orange Creamsicle Cake. First and foremost, it’s incredibly easy to prepare, which will have you spending less time in the kitchen and more time enjoying meaningful moments with loved ones. Using a box cake mix means that you can whip this dessert up in no time, making it ideal for busy schedules or last-minute celebrations. The refreshing flavor of orange combined with the creaminess of the frosting makes it a crowd-pleaser, perfectly capturing the essence of summer in every bite.
Ingredients
To create your Orange Creamsicle Cake, gather the following ingredients that will fill your kitchen with delightful aromas:
- 1 box orange cake mix – Simple yet bursting with vibrant flavor.
- 3 large eggs – This will add richness and bind your ingredients together perfectly.
- 1 cup milk – To create a moist and tender crumb.
- 1/2 cup melted butter – Infuses a dreamy creaminess into the cake layer.
- 1/2 cup orange sherbet, softened – Adds that iconic Orange Creamsicle taste, elevating the flavor profile.
- 1 cup heavy cream – Essential for a rich and luxurious frosting.
- 1/2 cup powdered sugar – Sweetener for the frosting, providing just the right amount of sweetness.
- 1 tsp vanilla extract – Adds depth to the frosting flavor.
- Orange fondant or icing for petals – To craft lovely daisy decorations.
- Yellow fondant or icing for the center – A vibrant contrast to the petals.
- Green icing for leaves – To add a touch of freshness to your cake design.
Step-by-Step Directions
Step 1: Preheat the Oven
Preheat your oven to 350°F (175°C). This sets the stage for your cake to bake evenly.
Step 2: Prepare the Pans
Grease and flour two 9-inch round cake pans to ensure your cake layers release easily after baking.
Step 3: Mix the Batter
In a large bowl, combine the orange cake mix, eggs, milk, melted butter, and orange sherbet. Beat on medium speed until the mixture is smooth and well blended. The batter will have a vibrant orange color, making it look as delightful as it will taste!
Step 4: Bake the Cake
Pour the batter evenly into the prepared pans. Bake for 25-30 minutes or until a toothpick inserted into the center comes out clean. Your kitchen will be filled with the tantalizing scent of orange as the cakes rise.
Step 5: Cool the Cakes
Let the cakes cool in the pans for about 10 minutes. Then, transfer them to a wire rack to cool completely. This is an essential step to avoid a messy frosting application!
Step 6: Prepare the Frosting
While your cakes are cooling, prepare the frosting. In a mixing bowl, combine the heavy cream, powdered sugar, and vanilla extract. Beat until stiff peaks form—this will create a light, fluffy frosting that’s perfect for layering and decorating.
Step 7: Assemble the Cake
Place the first cake layer on a serving platter. Spread a generous amount of frosting over the top. Carefully add the second layer and frost the entire cake smoothly, creating a beautiful canvas for your decorations.
Step 8: Decorate
Roll out fondant for the daisy petals and the center. Arrange the petals around the top of the cake, adding the yellow center for that charming daisy look. Use green icing to pipe leaves, bringing your floral cake to life.
Step 9: Slice and Serve
Once decorated, slice the cake and serve it to eager guests. Enjoy the compliments as they relish the deliciously refreshing flavors!
Tips & Tricks
- Make It A Day Ahead: This cake is even better the next day, so consider making it in advance.
- Use Fresh Orange Zest: Adding a little freshly grated orange zest to the batter or frosting enhances the citrus flavor beautifully.
- Experiment with Flavors: Switch it up by using lemon cake mix or adding spices like cinnamon or nutmeg for a warm twist.
- Keep Your Tools Cold: For frosting, keep your mixing bowl and beaters chilled for fluffier whipped cream.
- Fondant Handling: If you’re new to fondant, be gentle while rolling it out, and use cornstarch to prevent sticking.
Serving Suggestions & Pairings
This Orange Creamsicle Cake is versatile and can be served in various delightful ways. Pair it with freshly brewed tea or iced coffee for a relaxed afternoon treat. It’s perfect for summer barbecues, birthday celebrations, or even casual picnics at the park. Serving it alongside fresh fruit like strawberries or raspberries adds a juicy contrast to the creaminess of the cake.
Nutritional Information
Each slice of Orange Creamsicle Cake (based on 12 servings) contains approximately:
- Calories: 310
- Total Fat: 18g
- Saturated Fat: 11g
- Cholesterol: 70mg
- Sodium: 230mg
- Total Carbohydrates: 37g
- Dietary Fiber: 0g
- Sugars: 20g
- Protein: 3g
While this cake is a treat that should be enjoyed in moderation, pairing sweets with healthy ingredients like fresh fruit can help keep your dessert experience balanced.
Storing Tips & Variations
Storage: Store any leftover cake in an airtight container at room temperature for up to 3 days. If you need to keep it longer, refrigerate it for up to a week or freeze for up to three months.
Variations: Consider making cupcakes using the same batter for easy portion control or even layering it with cream cheese frosting for a tangy twist. You can also customize your decorations for various occasions—think different flower designs for a spring or summer theme!
Conclusion
The Orange Creamsicle Cake with Daisy Decoration is a breathtaking addition to any dessert spread, with its vibrant colors and irresistible flavor. I highly encourage you to try this recipe at home. It’s not just a cake; it’s a nostalgic treat that will surely bring smiles to everyone’s faces. Please share your experience and any modifications you made in the comments below!
FAQs
1. Can I use homemade cake mix instead of a box mix?
Absolutely! Just ensure your homemade recipe yields a similar amount and includes orange flavoring.
2. What if I don’t have fondant for decoration?
You can easily use colored icing or whipped cream to create decorations. Just be creative with piping techniques!
3. Can I use a different flavor of sherbet?
Yes! You can substitute with other flavors like lemon or raspberry for a different fruit twist.
4. What is the best way to slice the cake?
For clean slices, use a sharp knife and dip it in warm water before cutting; wipe it between slices.
5. Can I make this cake gluten-free?
Certainly! Use a gluten-free cake mix and ensure all other ingredients are gluten-free certified.
Orange Creamsicle Cake
Ingredients
Method
- Preheat your oven to 350°F (175°C).
- Grease and flour two 9-inch round cake pans.
- In a large bowl, combine the orange cake mix, eggs, milk, melted butter, and orange sherbet. Beat on medium speed until smooth.
- Pour the batter evenly into prepared pans and bake for 25-30 minutes or until a toothpick comes out clean.
- Let the cakes cool in the pans for 10 minutes, then transfer to a wire rack to cool completely.
- In a mixing bowl, combine heavy cream, powdered sugar, and vanilla extract. Beat until stiff peaks form.
- Place the first cake layer on a serving platter and spread a generous amount of frosting on top.
- Add the second layer and frost the entire cake.
- Roll out fondant into petal shapes, arrange around the top of the cake, and add the yellow center.
- Pipe green icing for leaves to complete the decoration.
- Slice the cake and serve. Enjoy the compliments!