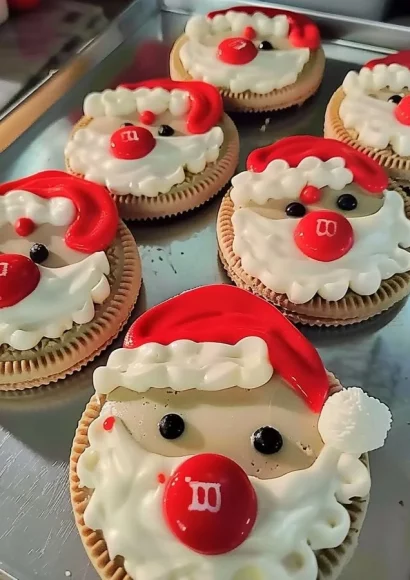
DIY Santa Oreos
Experience the joy of the holidays with these delightful DIY Santa Oreos. This fun and creative recipe brings a festive charm to your gatherings, combining creamy, rich flavors with a whimsical presentation. The aromas of melted white chocolate and sprinkles waft through the kitchen as you embark on this step-by-step journey. The texture of each bite offers a delightful crunch followed by the tender melt of chocolate and subtle sweetness, evoking feelings of warmth and nostalgia. So, roll up your sleeves and get ready to create a holiday treat that will bring smiles to everyone’s faces!
History / Fun Fact
The tradition of decorating cookies during the holiday season dates back centuries, with various cultures adding their unique flair. The use of cream-filled cookies like Oreos dates back to 1912 when Nabisco introduced them. Since then, Oreos have become more than just a cookie; they symbolize celebration and indulgence. By transforming plain Oreos into jolly Santa figures, we pay homage to both classic cookie decorating and the beloved figure of Santa Claus, who has been a part of Christmas folklore for generations. The DIY Santa Oreos combine this rich history with a playful twist, making them a perfect addition to modern holiday celebrations.
Ingredients
- 12 Oreo cookies: Classic chocolate wafers that provide a rich, creamy filling, perfect for our Santa creation.
- 1 cup white chocolate chips: Melting into a smooth, sweet coating that enhances the overall flavor and transforms the Oreos into something magical.
- Red and green sprinkles: Bright and festive, these add a delightful crunch and vibrant color that captures the holiday spirit.
- Mini chocolate chips: Small but mighty, they serve as expressive eyes for our jolly Santa.
- 1/2 cup edible candy eyes (optional): Adding fun and character to each Santa, these eyes will make your cookies come alive.
- 12 mini marshmallows: Soft and fluffy, these serve as Santa’s iconic hat, adding a whimsical touch.
- 1 tablespoon coconut flakes: Light and airy, they create a beautiful beard for Santa, giving a lovely texture contrast.
All ingredients used are halal-friendly, ensuring everyone can enjoy this festive treat!
Cooking Time & Tips For DIY Santa Oreos
Preparing these charming cupcakes is a swift process—each batch takes about 30 to 45 minutes, making them a quick holiday craft to create with family or friends. Quick preparation allows for spontaneous creativity, perfect for when guests drop by. If time is on your side, take a slower approach, allowing the chocolate to thicken slightly before dipping, or even experimenting with different kinds of decorations.
For success, a few practical tips include ensuring your white chocolate is not overheated, as this can lead to clumping. Additionally, sprinkle decorations should be applied while the chocolate is still wet for optimal adhesion. Whether you’re short on time or looking to savor the moment, these tips will help you create perfect Santa Oreos!
Step-by-Step Directions
-
Melt the White Chocolate: Begin by placing the white chocolate chips into a microwave-safe bowl. Heat them in the microwave for 30-second intervals, stirring after each interval. Keep going until the mixture is perfectly smooth and creamy, inviting you to dip those cookies.
-
Dip the Oreo Cookies: Take each Oreo cookie and dip it into the melted white chocolate. Ensure the cookie is fully submerged, allowing the chocolate to coat every inch beautifully. Use a fork to lift the cookie out, letting any excess chocolate drip back into the bowl.
-
Prepare for Decoration: Place the coated Oreo cookies on a parchment-lined baking sheet, ensuring they have ample space between them.
-
Add the Sprinkles: While the chocolate is still wet and glossy, generously sprinkle red and green sprinkles on top, creating a festive touch that catches the eye.
-
Attach Santa’s Hat: For Santa’s hat, take a mini marshmallow and gently press it onto the top of each Oreo. This will add a fluffy, whimsical aspect that embodies the spirit of Santa Claus.
-
Create Santa’s Eyes: Use mini chocolate chips or edible candy eyes to craft his cheerful expression. If you’re using chocolate chips, gently press them into the melted chocolate before it hardens for a delightful embedded look.
-
Design Santa’s Beard: Sprinkle coconut flakes around the bottom of the marshmallow to create a fluffy beard that completes the Santa look.
-
Let It Set: Allow the chocolate to set completely, either at room temperature or in the refrigerator for about 15-20 minutes, until they have a firm, shiny finish.
-
Serve Delightfully: Arrange your finished Santa Oreos on a festive platter, ready to bring cheer and sweetness to any holiday gathering!
Serving Suggestions & Occasions
DIY Santa Oreos make a delightful treat for various occasions. They shine at festive gatherings, holiday parties, or as fun, creative gifts for family and friends. Imagine them adorning your holiday dessert table, capturing attention with their cheerful faces. Perfect for sharing with kids or sneaking a few away as a sweet indulgence for yourself, these Santa Oreos are versatile and will surely become a regular feature in your holiday traditions.
Common Mistakes For DIY Santa Oreos
-
Chocolate Overheating: Be cautious while melting the white chocolate. Overheating can lead to a clumpy texture. Always use short intervals and stir well.
-
Insufficient Cooling Time: Rushing the setting process can result in messy decorations. Allow adequate time for the chocolate to harden properly.
-
Lack of Sprinkles: Forgetting the sprinkles can result in plain-looking cookies. Remember, the visual appeal is just as important as the taste!
-
Too Much Chocolate: If you dunk the cookie too deeply, it may be overly coated. Balance is key for an enjoyable taste experience.
-
Not Using Parchment Paper: Skipping the parchment paper can lead to a sticky situation, making it hard to remove the cookies once set.
Healthier Alternatives & Variations
If you want a lighter version of these festive treats, consider using dark chocolate instead of white chocolate for a richer taste. You can substitute organic Oreos or gluten-free cookies to cater to dietary preferences. For a fruity twist, add dried fruit pieces to the decorations or switch the coconut flakes for finely crushed nuts. Another fun variation is to make different holiday characters, such as snowmen or reindeer, using similar ingredients.
FAQs
-
Can I use regular chocolate instead of white chocolate?
Yes! Regular chocolate will work, but the flavors will differ. White chocolate brings a sweeter and creamier taste. -
How long do these cookies stay fresh?
These cookies can last for up to 5 days if stored in an airtight container at room temperature. -
Can I freeze Santa Oreos?
Yes, you can freeze them! Just ensure they are stored in an airtight container to maintain freshness. -
What decorations work best for Santa’s face?
Mini chocolate chips, edible candy eyes, or even colored icing can be used for Santa’s cheerful expression. -
Can children help with this recipe?
Absolutely! This is a fantastic recipe for kids to get involved in. Just supervise the melting of chocolate and any sharp utensils. -
Are there dairy-free alternatives for this recipe?
Yes! Look for dairy-free chocolate chips and vegan Oreos to make this treat accommodating for dairy-free diets.
Conclusion
This holiday season, elevate your festivities with the delightful DIY Santa Oreos. With their charming appearance and irresistible flavors, they are sure to be a hit at any gathering. The smiles and laughter that come from creating and sharing these sweet treats will fill your home with joy and warmth. Don’t wait—gather your ingredients and dive into this sweet adventure today! Tailor it to your taste and create memories that will last for years to come. Happy baking!

DIY Santa Oreos
Ingredients
Method
- Melt the White Chocolate: Place white chocolate chips in a microwave-safe bowl. Heat in the microwave for 30-second intervals, stirring after each, until smooth.
- Dip the Oreo Cookies: Dip each Oreo into the melted white chocolate, making sure it's fully coated. Use a fork to lift it out and let excess chocolate drip back.
- Prepare for Decoration: Lay coated Oreos on a parchment-lined baking sheet, providing enough space between them.
- Add the Sprinkles: While the chocolate is still wet, generously apply red and green sprinkles.
- Attach Santa's Hat: Press a mini marshmallow onto the top of each Oreo.
- Create Santa's Eyes: Use mini chocolate chips or edible candy eyes for his expression.
- Design Santa's Beard: Sprinkle coconut flakes around the bottom of the marshmallow.
- Let It Set: Allow chocolate to set, either at room temperature or in the refrigerator for 15-20 minutes.
- Serve Delightfully: Arrange finished Santa Oreos on a festive platter.